
Introduction to Game Programming in Scratch
My son has been wanting to learn to program, so I got him hooked up with scratch. I originally posted this article a long time ago, and haven't edited anything since July 2, 2016. A few things are probably different with scratch now, but I think it's similar enough to get you going.
Table of Contents
- Introduction to This Tutorial
- Scratch Basics
- Game 1: Click and Move
- Game 2: Maze Game
- Game 3: Bat Chase
- Game 4: Traughn
- Game 5: Block Breaker
- Game 6: Meteor Dodge
- Game 7: Asteroids
- Game 8: Simple Platformer
- Game 9: Vertical Shmup
- What’s Next
Introduction to this Tutorial
So over the past year and a half, I’ve been volunteering, teaching a programming class at a local elementary school. Scratch is a great language for teaching kids, since it’s graphical and easy to get simple games built fast. And when you’re teaching elementary-age boys (+ one girl, my daughter) to program, all they want to do is make games. So here is the basically the course I came up with. It is mostly video tutorials, so the kids can go their own speed. I hang out in class and answer questions and give hints. Once they finished all these tutorials, I had them build their own project ideas.
Scratch is a graphical programming language that was designed to teach programming by MIT. You can download an installable version, or you can sign up for an account at scratch.mit.edu and use the online scratch editor.
Here’s a video showing some of the things you can do in Scratch:
Scratch Basics
Scratch has a built in tutorial that is a good way to get started.
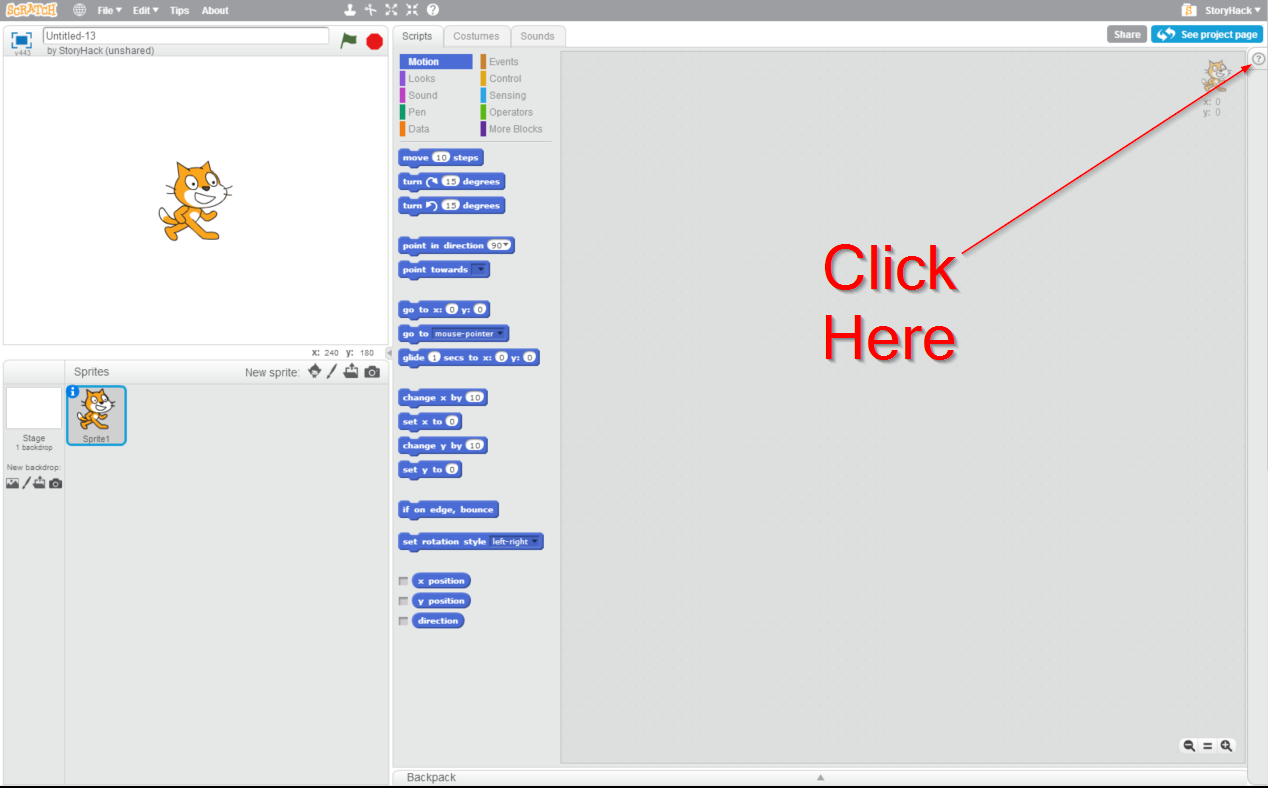
So start up scratch, either click “create” on the website - scratch.mit.edu or install the downloadable version and run it.
In the upper right hand corner there is a question mark. Click it to bring up the help menu.
Then click on the first option “Getting Started with Scratch”
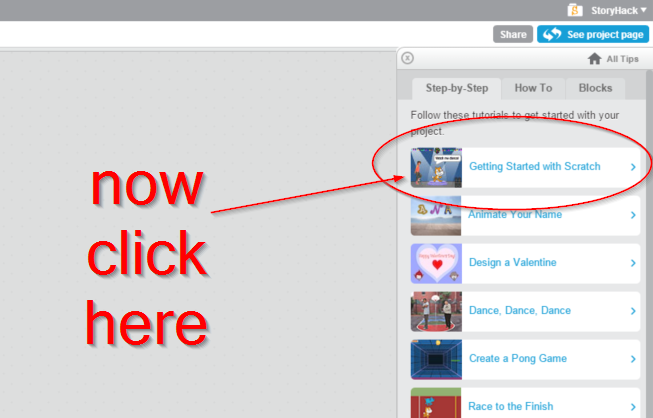
Follow the tutorial until the end.
Game 1: Click and Move
This video walks you through the making of a very simple game in scratch. I call it “Click and Move” because I have no imagination.
In this video, I talk about the scratch surface, sprites, loops, simple interaction with a sprite, the idea of resetting a game, picking random numbers, and variables.
Here are some ideas for making your game better after you finish the tutorial.
- change something else about the cat every time he is clicked(color, size…)
- change the background
- add in another sprite that you shouldn’t click - one that takes away points.
- add in a high score function
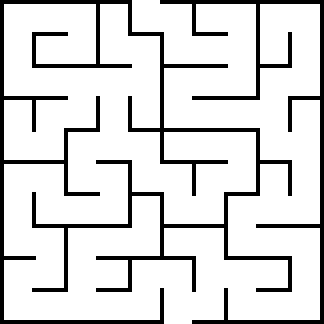
Game 2: Maze Game
This tutorial is avalable to watch at vimeo:
Maze - Invent with Scratch 2.0 Screencast from Invent with Scratch on Vimeo.
Thanks to Al Sweigart for making it.
Game 3: Bat Chase
This is a Daleks-style game, but once you start, there’s no pausing.
Daleks - Invent with Scratch 2.0 Screencast from Invent with Scratch on Vimeo.
Thanks again to Al Sweigart!
Game 4: Traughn
Similar to the ever-popular light cycles game, but with spaceships.
Tron - Invent with Scratch 2.0 Screencast from Invent with Scratch on Vimeo.
Al Sweigart made this one, too. I’m starting to see a pattern.
Game 5: Block Breaker
Similar to breakout-style games.
Block Breaker - Invent with Scratch 2.0 Screencast from Invent with Scratch on Vimeo.
Bonus credit - consider how you would do this with only one block sprite.
Al Sweigart is awesome and made this video, too.
Game 6: Meteor Dodge
Meteor Dodge - Invent with Scratch 2.0 Screencast from Invent with Scratch on Vimeo
Thanks yet again to Al Sweigart.
Game 7: Asteroids
Invent with Scratch 2.0 Screencast - Asteroids from Invent with Scratch on Vimeo
Thanks go to Al Sweigart for this one, too.
Game 8: Simple Platformer
This one is a tutorial that will get you started on a platformer game, rather than a whole game by itself. See what you can come up with!
Here’s a couple of things you can import to use: Happy Guy (player sprite) and board 1 (480x360 sprite in black and transparent)
Also, if you get weird “player rising from the ground” animations while playing, right click on your physics definition, then choose edit. click the arrow next to “options” then make sure the box labeled “Run without screen refresh” is checked.
Some things to try adding
- A way to win.
- A way to die.
- Multiple levels.
- Objects to gather/objectives to meet.
This tutorial was made by YouTube user PullJosh.
Game 9: Vertical Shmup
This game we’re going to build a little differently. We’ll build the game up bit by bit, testing your scratch knowledge as we go. We’ll build a vertical shoot’em up (shmup). Every version will get more and more complete, and every version will have a couple of bugs that you need to fix.
Step 1: The ship
The player is going to control a ship that has to fight a swarm of invading aliens. So our first step is to make a ship that the user can fly around.
There are two bugs in this step that you need to fix:
- The ship does not fly to the right when you press ‘d’
- The fire on the back of the ship is not flickering
Click the link and then click “See Inside,” then fix the bugs. Once you have fixed the bugs, show your teacher.
https://scratch.mit.edu/projects/108233538/
Step 2: Lasers
In this version we are going to add lasers. We want the ship to be able to fire, but we don’t want a constant stream of shots. We want the laser to requite time to cool down between shots. We are going to handle this with a variable called “laser reload.” Every time the player shoots (spacebar) the variable is set to 10. Every time through the player’s loop the variable should decrease by one. When the variable reaches 0, the player can fire again.
Here are the bugs you need to fix this time around:
- Something is wrong with the firing controls. You can only fire once.
- The laser does not disappear when it hits the top of the screen.
- The laser seems to fire from somewhere to the right of the ship. It should come from the ship itself.
https://scratch.mit.edu/projects/108233538/
Once you fix those problems, show your instructor your solutions.
Step 3: Monster #1
This time, we’re adding a monster. Here’s the bugs to solve:
- The monster’s tentacles wiggle way too fast. Find a way to let him wiggle every few times he moves to the right or left.
- The monster is not bouncing correctly. He just goes to one side and then stops. Find a way to make him keep moving.
https://scratch.mit.edu/projects/108508006/
Once you fix those problems, show your instructor your solutions.
Step 4: Monster spits acid
Now we are going to make the monster spit acid every so often. There are two bugs this time around.
- Once the monster starts to spit acid, he spits it too fast. He’s only supposed to spit acid once for every 40 times through the loop. There is a variable called “acid counter” that counts up to 40 that is supposed to help with this.
- The acid is a little too difficult. Right now, when the monster shoots, the acid continues to change direction to follow the ship. You need to change the program so that the acid aims for the ship only once, and then continues in a straight line until it hits the edge.
Once you’ve fixed these bugs, show your instructor your solution.
https://scratch.mit.edu/projects/100381306/
Step 5: Acid and lasers do damage
Now that the Monster spits acid, that acid and the lasers should do damage. The ship is kind of weak and will die if it is hit even once. The monster is a little bit tougher, and has to be hit several times.
- When the acid is touching the ship, it sends out a broadcast that says “splat”. When the ship receives that broadcast, it should die. But right now, nothing happens. Fix it.
- Also, the monster detects when he is hit, but he never dies! Fix it.
https://scratch.mit.edu/projects/109488823/
Show your instructor your solutions.
Step 6: Levels
Now we’re adding levels. First we’ll create a levels variable and a monster count. We set the level to 1 then broadcast a “next level” message. The backdrop will recieve that message, generate a bad guy, and set the monster count to 1. Every time a monster dies, he changes the monster count by -1. and if the monster count is 0, he sends out a next level broadcast. Here’s this step’s bugs:
- Even though the second level is supposed to have 2 monsters, it looks like we just have to keep replaying the same level one over and over.
- Not so much a bug, but add another level that the player needs to complete before he sees the “You Win” backdrop message.
https://scratch.mit.edu/projects/109567305/
Show the instructor your solutions.
Step 7: Monster #2
Let’s add a second monster. This monster has a cool death animation. Here’s what you need to do.
Bugs/etc:
- The monster is cool, but you can beat the game without seeing him. Make the new monster be in the first level. Use a “repeat” block to add 3 of him to the level. Test to make sure it works and you can get to the second level.
- Every so often the counter called “m2random count” counts down to zero, and then resets to a random amount. Every time that happens, the monster is supposed to point in a new random direction. Make it so.
https://scratch.mit.edu/projects/110546781/
Show your instructor your solution.
Step 8: Boss
I couldn’t think of anything scarier, so my head is the boss.
Bugs/etc:
- No matter how many times you shoot the boss, he never dies!
- It’s kind of boring without sound - add some noises to various game events.
https://scratch.mit.edu/projects/111350990/
Show your instructor your solution.
Play the final game.
Have some fun for a minute and a half. https://scratch.mit.edu/projects/111378255
What’s Next
Now that you’ve learned the basics of building a game in scratch, you might want to learn something bigger or better or maybe even just keep going with scratch. Here’s some resources to get you going.
- Scratch - the homepage of scratch. Lots of games to play, look at, and pick apart.
- Stencyl - Stencyl is similar to scratch in that you build commands with blocks, so it would probably seem familiar to you. There is a free version. It is a bit more powerful than scratch.
- Invent Your Own Computer Games With Python - Python is a popular language, and this is a great free online book to get you started. The man who wrote this book also did many of the tutorials I’ve used in this course. It looks more like what you normally think programming should look like - you type text into a text editor. If you’d like to do more with programming than just write simple games, this would be a great place to start.
- GameMaker Studio - Again, there is a free version of this one. There are also lots of tutorials and forums and such to help you learn it.